Monday, April 30, 2012

French Fry Boxes and more...

Geeze, when I look back on the week, I really don't have much to say. Midweek I posted my new website which went live at Party Connection Events.  I love it,  have you checked it out?  And I finished a little Mini Catalog this week on Issuu.  I like how it came out, but now I am already looking to change it for next time, it's a little too plain, guess that's the creative side of me.  At least you can get an idea of some things I have created and the supplies I use. 
I did make a couple cute favors last week. I just love making these french fry boxes!!  They are just so cute in many different colors, prints and sizes.  I have even taken a piece of cardstock that's printed on one side and I printed on the opposite side...very cute!    I have a 12 x 12 Photo Printer that makes the process easy!  Makes nice liners.


This pink french fry box is sample for a gal who is getting married and her bridal party will be assembling the boxes for the bridal shower.  Now this is my FAVORITE type of  job...cutting favor boxes.  I design a favor box, cut them, create a instruction sheet on how to assemble, then I sit with the bridal party for 30 minutes or so and show them how to put it together!  My fee is VERY reasonable and everyone loves the quick and easy assembly. Everything is put together in a day and I have a VERY happy bride. I offer this to EVERYONE, not just brides.  You can either bring me your cardstock, or I will email you a color pallet that I will purchase, then you pick the party favor and I can cut everything for a fee, per sheet, and of course the cost of the paper.  It works out great for everyone. I have a couple ladies who also enjoy making favors and selling at craft shows but they do not have cutting machines, so it works out great for them too. Like I said, very reasonable.     
I start reading two books this week.  One is Sweet Designs by Amy Atlas which I LOVE!  I am only half way through, but so far...it's great and I have learned several new things.
Sweet Design by Amy Atlas...GREAT book!
The second book is CelebraTORI which I downloaded on my IPad.  I haven't started reading it yet but flipped through and I know I am going to LOVE it.  I love the way she breaks down each party.  Being an event planner, I like to keep up on the latest party planning books.  I hear my friend, Debi Lilly also has a book out called The Perfect Event so her book is on my list next!!! Maybe I will get it for Mother's Day!
Next week I will have 3 Pint Size Cake Pop Centerpieces to share, and a sport theme and a school theme Cake Pop Centerpiece to share with you as well.  Hoping to have some other favors as well.  I better get busy...

Have an EVENTful week!!
Margie


Friday, April 27, 2012

Spring Catalog and Idea Book 2012

Very exciting...our new catalog is ready for you to view! It's jam-packed with party favors and centerpiece ideas!  Scroll all the way to bottom of the blog on the right!!  I will try to update this each week as new supplies arrive and ideas are created.  

Thursday, April 26, 2012

Let us plan your next company event!!


So, I thought I would tell you a little bit about my "other" job.  Yes, I love Polka Dots and Parties, but it would have NEVER come about, if not for Party Connection Events!! They have given me this wonderful opportunity to not only, plan events with them, but also provide party favors, centerpieces and party enhancements for their special events.  I was so excited and thankful for the opportunity that this is how Polka Dots and Parties was born!  
For the last 10 years, I have planned corporate events, holiday parties and company picnics.  In 2006, I met Party Connection Events. I began working with them the following year.  I plan several company picnics with anywhere from 500 to 3,000 guests.  I manage and execute these events from start to finish, hiring vendors, entertainment and catering. As the on-site supervisors, we attend these picnics making sure everything runs smoothly on event day.  The best part about planning is seeing all of the smiling faces of those who attend. From Push Carts to Pig Roasts, Tabletop to Big Top, Music, Magic and So Much More PARTY CONNECTION EVENTS plans it all!! So we say it like this....
PICK HOW MUCH FUN YOU WANT TO HAVE!  

Party Connection Events has EVERYTHING you need!! Contact Me  to plan your next event and supply you with some THEME favors as well!!

My New Website is up and RUNNING!!

Hi friends!!  My new website is up and running.  Please stop by Party Connection Events to find my link.  Let me know what you think...Leave a comment!!
New Catalog coming soon!!  See you Sunday for some really cute favors I made this week!!


Margie

Monday, April 23, 2012

Poppy Bouquet

Oh My Gosh.....I am so proud of my Poppy Bouquet. I have been working on this for a couple weeks, cutting, measuring, redesigning, gluing, more redesigning...and now I am happy to say that my flowers are just perfect; just the way I dreamed they would be.  This bouquet is great addition to my Pretty Poke Cake Pop Centerpiece.   As you look through the photos you will realize why the name Poppy Bouquet is appropriate for this piece....it's filled with all shapes and sizes of POPS, anything on a stick is considered a POP in my book! In these first couple photos, please be aware that these Cake Pops are PROPS...made from wood beads on sticks!  It's just easier for me to use props in my centerpieces when I am creating and designing, but they are the same size as regular Cake Pops and look good enough to eat, right?


So I thought I would give you some tips and tricks I used when coming up with this piece.  At first I started thinking this bouquet was going to be JUST for Cake Pops...but guess what?  You can use so many different candies, mini cupcakes, cookies and of course the famous Cake Pops in this centerpiece!!  I had some wonderful large, sugar coated, Gum Drops from Whole Foods, left over from Easter.  I just poked a toothpick into the bottom of them and added them to the center of the flower.  In some flowers I used 2 cupcake liners of different, coordinating patterns.  The sugar coating on the gumdrops remind me of glitter. (Yeah, already coated with BLING)!


I also tried Tootsie Pops and Blow Pops by TOOTSI ROLL. (did I mention that Tootsi Pop called me last month because they saw a centerpiece I made using Blow Pops on Pinterst? They loved them...whew...I thought I was in trouble!) Use bright colored flowers for a childerens' party. One stem for each child, so everyone gets a treat and they can take home a flower too.  

The next thing I tried was Fanny May Candy as the center in a Martha Stewart Mini Cup Cake LinerWho doesn't love the Martha Stewart Craft line?   I love, Love, LOVE everything Martha!! (As a matter of fact, my son-in-law calls me Margie Stewart...<grin>!!) Check out her line of cupcake liners.  They are sooooo pretty.  They really make this centerpiece pop!!  Her colors are just "DELICIOUS"!  They mix and match perfectly and the scalloped edging is a nice touch for the floral center.

I have to say, it always takes me a while to come up with my designs.  I see something in my head, but building can be a task for me...I guess that's half the fun, right?  I like a clean look, meaning lots of white and a pop of color.  Sturdiness is another important part of my building. I once took a centerpiece to a client and it collapsed, I had a quick remedy, but it could have been very embarrassing, lesson learned!   So even though these look pretty simple, the engineering part is a tough task for me.  Hahaha...I now wear an "engineering hat"!!
These last two flowers do not have anything edible in the center...just a button, but even that is cute!!  

Lastly, to answer a few of the questions I received last week.  "Do you sell your party pieces?"  YES, I DO sell my pieces.  I am an event planner so I love when I can add party pieces into my special events, birthday parties, and bridal/baby showers.  But you too can order anytime. Another question, "Do you use Cricut Cartridges?"  The answer...sometimes yes, but I have a TON of SVG files too and also cut my own patterns. This particular design was created using my Cricut Flower Shoppe Cartridge.  
So friends, it's time to call it a day.  I hope to blog a bit more mid week, I am working on something VERY EXCITING that happened over the weekend, and I can't wait to share it with you! Until then... Thanks for stopping by!!  Leave a comment...would love to hear from you!!


Happy Crafting!!
Margie


Thursday, April 19, 2012

Clear Packaging

I am always looking for cute, clear packaging.  I recently came across these 12 oz. cups with a dome lid and I just LOVE them!  So cute for favors...not just candy, but fun foods, trinkets and of course DRINKS, with a cute, colorful straws...and a straw huggers of course!  
I also have a smaller clear container with a dome lid...perfect for a regular size cupcakes.  I can create matching cupcake wrappers using your same theme as well.  No hole at the top, but plenty of room for a personalized sticker, which I can create using the same theme and or colors.  


Lets get back to the decorative, colorful, paper straws.  I have so many different colors and patterns.  Great for drinks, but I love to use them in so many different party pieces, and centerpieces.  It's fun to mix and match for a fun, festive party.  


 I just got these 1" x 8" Cello Bags, which I LOVE for candy filled party favors.  Of course, I like to add a "hugger" or a "topper" to stick with the theme.  Too cute for words...just take a look!!


That's all for now friends.  See you on Sunday, my regular blogging day. I hope to have a new piece completed that I KNOW Martha Stewart will just love, and I am going to do a Blog Share with you that is so STINKIN' cute!  Have a creative weekend!

Margie


More Favors...

I periodically design boxes for a friend who owns Indigo Rain Eventworks here near Chicago.  She sets up Candy Tablescapes and I create candy boxes for her. Each week she gives me several suggestions for favor boxes and I create them.  It's really been fun, and it gives me a chance to step "out of the box" and put together something different each week. Thanks Julie!!
Last week I made a cute pillow box with a zoo theme.  A couple of wedding cake slices.  A simple square with a fancy flower, and a Purse Favor Box. Like I said, it's really been fun just being creative and building something new and different.  


Monday, April 16, 2012

Favor Tails

I haven't blogged in a while, sorry about that!  I hurt my back and was out for 3 days, then after Easter I got sick and was out for another couple days.  Now I feel like I am behind by a week!! Time to catch up! 
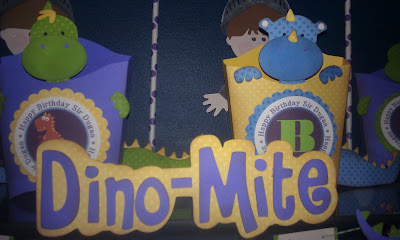
This weeks celebration is a Dragon and Knights Party.   I actually am not quite finished yet, but I will post what I have and add more later.      
First let me start by introducing my good friend Holly from Twist and Shout who designs all of my beautiful Balloon Centerpieces to match my party favors at my corporate events. (btw, I am a corporate event planner if you don't already know that)  This week, Holly's beautiful balloon decor is my In the Spotlight so check out her website...she is an AMAZING Balloon Artist!  Holly and I have worked together on events for the last several years.  I can't tell you how much it means to see the kids at my corporate events "light up" when Holly makes them a cute balloon character.  It's not just your typical run of the mill balloon poodle, or sword.  Holly goes ALL out for the kids bringing her balloons to life.  She is truly an artist and I love having her at my events!


Balloon twisted sculptures are PERFECT to serve as decor, but it's a nice take away, as well as a prize for winning a party game. We did this at my daughters' baby shower, and the ladies were so excited to choose the balloon sculpture they wanted to take home. (look under "baby shower" blog post for more on Holly's balloon sculptures.) Thanks Holly, for all you do for me!  I can't wait to see what else you come up with for my future parties.  
Dragons and Knights are all about little boys....knights, castles, dragons, shields, armor and maybe a damsel in distress!! So without further ado...


Hear Ye! Here Ye!  All Nobel Knights and Fair Ladies the King requests the honor of your presence at the Royal Celebration of Sir Dugan's 4th Birthday Party.  Please arrive on the 3rd day of June, in the year of our Lord 2012, at the hour of one, at King Phillip's Court and join us for great feasting and entertainment!  

I started with this adorable dragon SVG, adding layers and layers, giving him personality plus and of course the BLING!! 


He really came out cute...even much cuter than I thought. Let's start this party with a Centerpiece of Dragons and Knights. Normally, I make a Pretty Poke Centerpiece, but this time I just took the pokes and inserted them into a clear cup with lid, filled with gum balls. (see Candy Filled Method, posted Feb. 13th)  I think it would be cute to place these in individual vessels on your tables...add 1, 2, or 3 pokes per table.  Each poke is built onto a printed paper straw.  After your party, save these images for scrapbooks or banners for the child's bedroom...too cute to throw away!!  


So I didn't go all out and make a cake, and decorate it for this party, but I did find this adorable cake mold (in my kitchen cabinet).  I normally use it as a Sand Castle, but it really can be used as a Medieval Castle as well...how cute would that be?  Dress it up with flag pics, or maybe a Damsel in distress, so many creative ideas.   


I have to say, I love putting together the favor boxes.  These are Cricut French Fry boxes with the Dragon SVG attached.  I would add a napkin or food safe cello bag filled with cookies or candy inside, poke out the top, tie with a curling ribbon to match. Personalized digital art is a perfect add-on to my parties...cute, cute, C-U-T-E!!!


Each of my parties are individually handmade, per your theme and colors.  Please contact me for details.  Thanks for stopping by this week.  Stop back mid-week...I have more to blog about!  Have a Creative week!

Margie


Sunday, April 1, 2012

Fancy Favors

I made a few Favor Boxes last week I thought I would share.  I loved the way they came out.  A friend of mine owns a Candy Company that specializes in Candy Tablescapes for weddings and showers. (Her webpage is being redesigned so I will add a link when it is complete.) Anyway, she  uses my favors boxes to put her candy in...what a GREAT connection, hey?  She has been doing a lot of sales calls which is giving me a chance to really put my creative juices in gear and design some new things.  


I went a little crazy with these apple boxes.  The idea here was for a hospital, "An Apple a Day Keeps the Doctor Away."  I also made a few for a fall craft show...great for teachers gifts!


Don't you just love these adorable doctor bags?  I added a little tag that said, Doctor and Nurse Bag with a medical insignia on it. 


This wonderful little chair box serves more than one purpose.  I have since made one chair for each guest and write each name on the seating card along with the table number. Fill the box with a sweet or savory before dinner treat. Now for the back of the box...my favorite part!  Add a matching bow...cute, cute, cute!


So this next set of boxes are BRIDE and GROOM FAVORS.  Actually, these can be used for rehearsal dinners or even prom.  It's hard to see, but there is a silk bow tie on the tux box.  Again colors on box or ribbons can match the bridal party colors.  Very pretty! 


I have to say...this is really one of the prettiest boxes!!  I love the dry embossing paper I used on this box as well as the cute polka dot paper by Bo Bunny for the butterfly.  You'll notice I use a lot of this paper in all colors.  It really just jumps out at you!!  Watch for more embossed pieces coming soon. 


This is a BEAUTIFUL box.  I love how the bow actually looks like a part of the brides dress.  I think I would use wired ribbon next time so I could puff the dress more.  The box is big enough for many things.  The bow can be matched to the wedding colors and I would make a 3D flower for the bouquet as well.  I use Bazzil Dotted Swiss cardstock.  
I have another post this week, but I am going to hold off another couple days so I can complete something special....so I will post again MID Week!    Something fun and new in the SPOTLIGHT this next week.  
Thanks for stopping by friends!

Margie